Excerpt from ‘The Scoliosis Handbook of Safe and Effective Exercises Pre and Post Surgery’ by Caroline Freedman
Once your consultant has given you the go ahead to start to exercise again after spinal fusion surgery, you may be confused about how much or how little to do. If you were really fit before surgery, you are probably desperate to get back to your classes and the gym, and if you were not that fit then now is the time to really look after your spine and body. The idea after scoliosis surgery is to build up back muscles gently.
According to the surgeon from my third surgery, the general rule is to lift no more than 5 kilos with free weights. I listened to him and am strong with definition and strength in my arms, legs, and core that I am happy with. Everyone is different and so while this works for me and the many scoliosis clients I see, it is always a choice. These suggestions are here to guide you through what is a difficult journey for all of us. Training should be enjoyable; it is important to find a method that works for you. I love gentle weights, body balance, body conditioning methods and TRX Suspension Training. Sometimes I mix it up with Pilates Reformer and yoga.
Working out alleviates my pain and if I don’t train for a week, I can really feel the difference in my neck, shoulders and hips. I have 30 years experience of Personal Training and have worked out since I was 14 years old. I’m now 56 and have two children.
I hope you find the following helpful for your post fusion recovery journey. These are very basic movements to start with and in the next few weeks there will be more information given on exercises to challenge your body as you recover and gain your strength back. If you have not had a fusion, then these exercise tips can be used as guidance too when you are in your classes or training alone.
Starting to exercise again after spinal fusion
IS IT NORMAL TO FEEL PAIN?
You should not feel pain during exercise at all. If there is any pain in the joints – back, neck, hips, knees, shoulders, elbows, wrists – stop what you are doing immediately.
Gentle muscle pain after two days is normal in, for example, the quads (thighs), glutes (bottom) and abs (stomach). It is not normal not to be able to walk, or to have terrible neck and shoulder pain or to be in agony. If this happens, either the exercise was performed incorrectly or you have overdone it, or that exercise is definitely not for you.
Do not over-push yourself at any time after scoliosis surgery. Initially, fatigue sets in quickly, so always make sure there is a rest time when the session is finished. Chill out for at least 30 minutes afterwards.
With my clients I operate what I call ‘exercise allergy awareness’:
EXERCISE ALLERGY AWARENESS
- Start with one gentle exercise
- Start with low repetitions
- Wait for two to three days
- If you feel no pain at all after two to three days, continue with the first exercise and add a second
- Wait another two to three days
- If you feel no pain at all, add a third exercise to your routine
- Wait another two to three days
- If you feel no pain at all, add a fourth exercise, and so on. Acceptable pain at its maximum should be no more than gentle muscle pain.
If you do feel pain, you will now be aware that a particular exercise is to be avoided – just like a food allergy.
POSTURE/ALIGNMENT
At all times be aware of your posture. You now have a straighter back. Let’s look after it and make the best of the surgical result!
HOW TO STAND AND SIT DURING EXERCISE
This depends on where your fusion is. Often the vertebrae T1 and above have movement and some parts of your lower spine may also have movement. Always check with the surgeon exactly where there is movement, if any. Also check that all the exercises in this section are safe for you individually to do. I have listed them in The Scoliosis Handbook according to what is suitable for various stages of recovery and beyond. Just be sure to start extremely slowly. Here are a few to start at the very beginning with.
STARTING POSITION
Suck your abs in. Your pelvis should be tilted slightly forward. If you have movement in your lower spine, do not arch it. Shoulders down, head level and chin tucked in. When standing and exercising, always make sure your knees are slightly bent as this will take the pressure off your lower spine. Do not hyperextend (over-straighten) your elbows or knees.
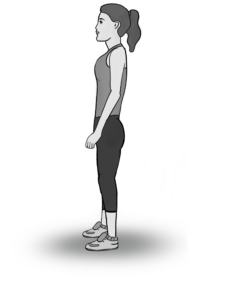
ALIGNMENT
Always be aware of your body alignment. Head, neck, shoulders, spine, hips, knees, ankles and toes should follow each other. A tip is to look down or check yourself in the mirror. Are your knees pulling together or your toes positioned inwards? Your knees should be front facing or slightly outwards and your toes positioned between 11 am and 1 pm OR 10 am and 2 pm.
BREATHING
I find some people concentrate so hard on their exercises that they forget to breathe and hold their breath. Look around any gym and you will probably see someone who is a bit red in the face. In my opinion, the easiest way to get your breathing right while exercising is to:
- Breathe in/inhale through your nose at the easiest point.
- Breathe out/exhale through your mouth at the hardest point (exertion).
Do not hyperventilate and overdo the breathing. It should be gentle or can cause dizziness/light-headedness.
For example, if performing a seated row breathe out as the weight is brought towards your body and in as the weight is released back. Breath in yoga is different, so be guided by the teacher taking the class.
WALKING
Start with walking a few steps, then increase to three minutes and up to 20 minutes per day. Your surgeon should advise you as to how to progress straight after surgery.
Focus on your posture – look in the mirror.
Heel to toe – start walking, placing your heel on the floor first, then the middle of your foot, following through with the ball of your foot and finally your toes. Lift your feet when you walk, as opposed to plonking them down or shuffling, not lifting your feet. Be aware of uneven pavements. Keep your shoulders down – your natural protective position may encourage you to close up, with your shoulders up by your ears and head slightly forward. Try to nip this postural position in the bud as soon as you can. Open your chest, drop your shoulders, suck in your core. You may feel weird standing upright, as if your body is screaming ‘look at me’. You don’t look weird – you’re just straighter than you were before your surgery.
SWIMMING
Your surgeon will probably suggest swimming. It strengthens the entire body. It is good both before and after scoliosis surgery. Front crawl and backstroke can be a bit of a challenge. I find Breaststroke is easier. Be careful not to swim with your head in the air.
FLOOR WORK EQUPITMENT
Lie on a good quality mat for comfort. For extra comfort at the gym, take your own mat to put over the mats provided. Also take a small cushion for your head if needed. A wedge under your glutes and upper thighs supports your lower back and helps you to keep your spine gently pressed into the floor. Roll up a sweatshirt or use a small cushion. Most of the equipment mentioned in The Scoliosis Handbook is available from amazon.co.uk, physioroom.com and/or Physicalcompany.co.uk.
FLOOR WORK POSITIONING – LYING DOWN ON YOUR BACK
I was always taught to keep my spine glued to the floor. This has prevented me and my clients from having any pain in our spines during and after exercise. There should be as little space as possible between your spine and the floor. Tilt your pelvis and keep your knees bent with your feet flat on the floor, with a wedge under your lower bottom/upper thighs for support. The wedge takes the pressure off your spine. If your ribs are uneven, put a soft wedge/hoodie rolled up under the side of your body that is slightly lifted. Make sure you are comfortable.
FLOOR WORK
To engage your core, imagine drawing your belly button into your spine, scoop your abdominals in and pull your pelvic floor up. You should feel like everything is being sucked in and your pelvis tilted upwards. If your hair is tied into a ponytail, make sure it is not interfering with the positioning of your head and neck, e.g. chin tilted too far back or forward. The space between your chin and chest should be about the size of an orange – try using one to gauge where the positioning should be – it works. Remember to breathe, in through your nose and out through your mouth, gently and without hyperventilating, in a relaxed manner.
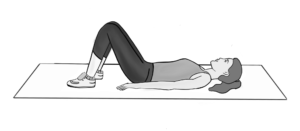
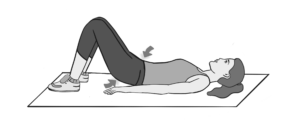
PELVIC TILT
This exercises your core and pelvic floor muscles:
- Lie on your back
- Knees bent
- Feet hip-width apart.
- Hips, knees, ankles and toes should follow the alignment from your hips. Feet and knees should be slightly turned out – to 11am and 1 pm or 10 am and 2 pm on the clock.
- Push your spine into the floor and tilt your pelvis up. Do not at this stage lift your pelvis off the floor. Suck your abs in. Squeeze your glutes very gently. (For women, pull in your pelvic floor muscles.) Relax.
- Repeat five times.
- Build up slowly over weeks to 10 x 2 sets.
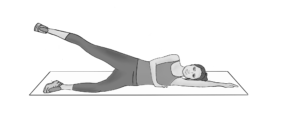
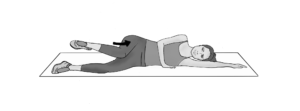
SIDE LEG RAISES
These build strength in hip flexors, glutes, quads (thighs) and abs.
Always have your underneath leg bent (see diagrams) for stability and support. Low ankle weights can be added with progression. (Also good for knee injury recovery)
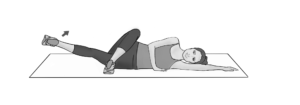
Variations of side leg raises include:
- Straight upper leg raises.
- Bending knee in towards the body and out.
- Top leg parallel with underneath leg – bending the knee gently, bringing the heel back to the glute.
- Inside thigh – place top leg over lower leg and lift lower leg up. Start with 10 reps on each side, building up to 30 reps x 3 sets.
Side Leg Raises
Suck in abs and place the top arm in front of you to help with stability. Under arm is outstretched so your head is in alignment.
Lift top leg, flex foot, make sure hips do not roll forward. Do not touch the floor when your leg comes down and be careful not to raise the leg too high.
Floorwork Quad and Glute Exercise
Bend knee in towards the body and out, avoiding locking the knee straight and keeping the leg parallel with the floor.
Floorwork Inside Thigh (adductor) exercise.
Place the top lower leg over the lower leg and lift the lower leg upwards using your inside thigh muscle. Keep your leg straight and foot flexed.
BACK STRENGTHENING
These exercises strengthen the lats and entire spinal area. I have listed them in the order to be followed during recovery. Start with six reps, building up to 20 x 3 sets.
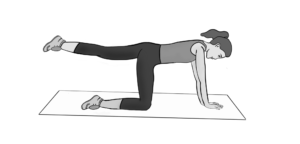
ALTERNATE LEGS
- Start on the floor on all fours
- Suck your stomach in so that your core is solid and fixed
- Do not arch your back
- Slowly extend one leg straight out, hold for as long as is comfortable
- Then repeat on the other side.
ALTERNATE ARMS
With lower legs on the floor, slowly extend one arm straight out and hold for as long as is comfortable. Then repeat on the other side.
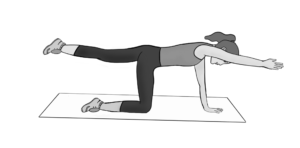
ALTERNATE LEGS AND ARMS (kneeling superman)
Raise the opposite arm and leg. Do this exercise slowly and ensure your hips are level with the floor by taking care not to raise the leg too high.
Imagine that your lifted arm and leg are being pulled to the opposite ends of the room, so you really feel the stretch of your limbs.
CRAWLING
This movement will strengthen all your spinal muscles.
On a mat, with leggings/trackies protecting your knees, crawl forward, then crawl back. Or crawl around a room at home. I get clients to put a music track on and start with about 20 seconds, building up to around 3 minutes over time.
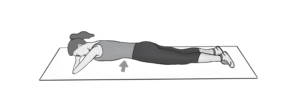
BEGINNER ABDOMINAL EXERCISE LYING FACE DOWN (also great after pregnancy)
- Lie flat on your stomach.
- Your head should be resting on your hands with your face looking downwards and you should feel comfortable.
- You can also concentrate on your pelvic floor while doing this exercise. Focus on drawing in your pelvic floor muscles.
- Focus on keeping your ribs and hips on the floor.
- Now try to suck in your stomach. When strong, your abs should be slightly lifted off the floor so you can aim to slide a hand under.
- Make sure you are lying straight as you can so your hips are evenly placed on the mat or floor. Your body should be totally relaxed.
- Breathing correctly is really important with this exercise. Breathe in through your nose as your abs are sucked in and lifted, hold for 10 seconds and then exhale through your mouth slowly as you relax your abs.
- Repeat this exercise up to 10 times.
This exercise may make you feel a bit nauseous, if you hold your breath, because of lack of oxygen, so really concentrate on breathing at the same time as performing it; as soon as you stop performing it for a minute, the feeling will pass. This exercise is a great starting point to build your abs back without straining your neck or spine.
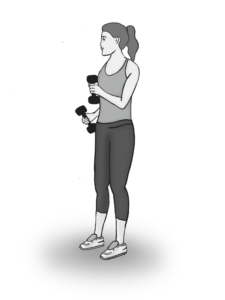
STANDING BEGINNER ABS WITH FREE WEIGHTS
A John Rutherford – Physio exercise
This exercise works the core:
- Stand with your feet hip-width apart, your pelvis slightly tilted forward and your shoulders relaxed OR sit on a chair with your feet out in front of you, making sure your knees are not over your toes
- Check that the alignment of your hips, knees, ankles and toes follow through in the same direction.
- Make a fist with both hands.
- Imagine you are walking fast and your arms are swinging with your elbows bent. Hold your core tight, only your arms should be moving, with your elbows bent. Move your arms as quickly as you can, while holding your core still.
- To build up intensity add light free weights up to 2 kg.
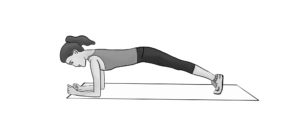
PLANKING (using elbows)
This works the core and entire body.
To get into position, start on your hands and knees on a mat. Then lift your knees off the mat and push your feet back, extending your body and pressing your toes into the mat, making sure they are hip-width apart; keeping your hips elevated and not dipping them, bring your arms down so you are resting on your forearms at shoulder width. Do not let your shoulders dip.
Another way to get into a plank position is to kneel down, then rest on your forearms and extend your legs out, lifting your shoulders. Your elbows should be directly under your shoulders in a right-angle position.
My physiotherapist, who specialises in idiopathic scoliosis, has always said to slightly lift hips when planking, so as to avoid performing a horizontal/level position – doing so will put too much pressure on your back. Lifting your hips is far more effective as you will really feel your lower abs engage.
Concentrate on drawing in your lower abdominal muscles, pulling them inwards towards your spine.
Whether on your elbows or standing hand/high plank, the same technique applies.
To come down gently, bring your knees to the mat and sit gently back on your heels.
There is often conflicting and differing opinions on exercise. We want you to find a way to incorporate exercise into your life, as the benefits of exercise for those with scoliosis cannot be overstated.
This information is designed for educational purposes only. You should not rely on this information as a substitute for, nor does it replace, professional medical advice, diagnosis, or treatment. Exercise is not without its risks and this or any other exercise program many result in injury. As with any exercise program, if at any point during your workout you begin to feel faint, dizzy or have physical discomfort, you should stop immediately and consult a medical professional. Reference to any specific product, service, process, or method does not constitute an implied or expressed recommendation, endorsement, or favouring by SAUK.
Caroline Freedman: Personal Trainer and TRX Sports Medicine Suspension Training exercise professional, author of The Scoliosis Handbook of Safe and Effective Exercises Pre and Post Surgery. www.scoliosishandbook.com @scoliosishandbook
Published by: Hammersmith Books – Hammersmith Health Books
Illustrated by: Dunelm Digital – www.dunelmdigital.co.uk
Photos by: Sam Pearce – www.square-image.co.uk
‘Images courtesy of Scoliosis Association UK’